On-Campus JobX Training
On-Campus JobX Training
2023-2024 Updates
Important:
You will post one position and it will be visible to all students regardless of their award. During the hiring stage, when you generate the JobX hiring message- you will be provided with the chartfield string relevant to your students award. Please take note of the chartfield string during that stage! This is very important to ensure each student is set up correctly. Only hire one student at a time in JobX, do not go back during any process of hiring or the hiring message will be lost.
Rehiring a student? If you want to open a position for an individual student to hire, put “REHIRE ONLY” at the end of the title to defer new applicants.
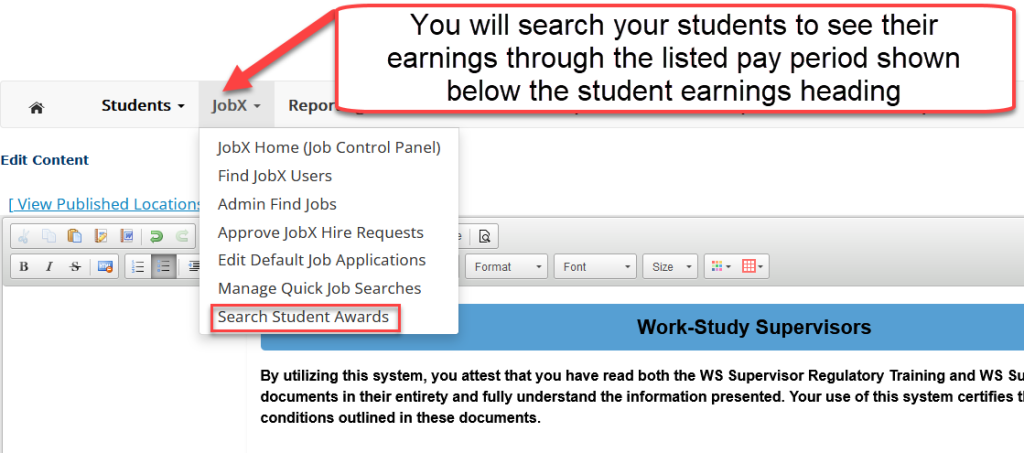
Did you know? You can now check your students’ earnings on the JobX website.

What is JobX?
- An online space for employers to create and post positions
- An online system by which students can search job postings
- An application/selection portal allowing students to apply to positions and managers to hire them
- A hiring record system, keeping track of which student is employed in which position
- Communication and reporting tool, allowing the Work-Study (WS) office to contact students and supervisors with current positions
Training Sections
See each section below to complete the JobX Training
Step 1.
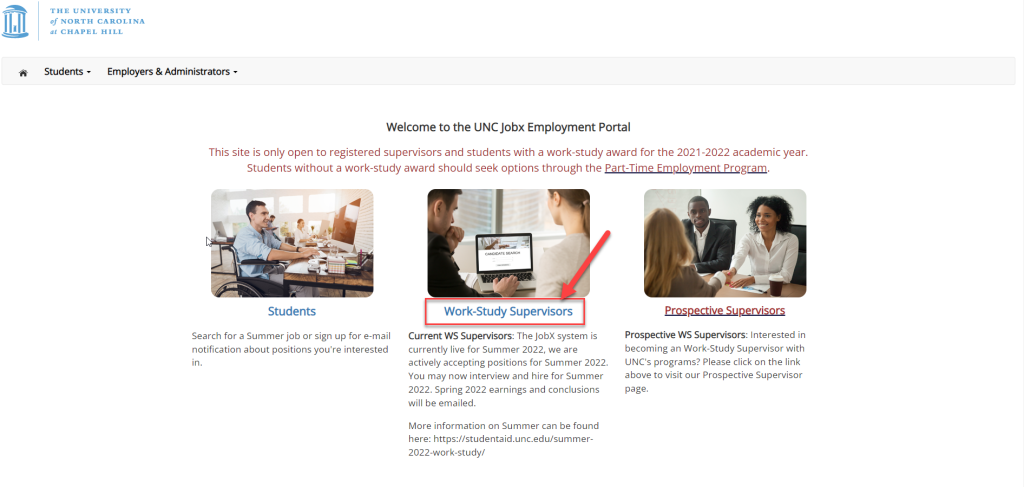
Go to the JobX website and click on ‘work-study supervisors’:
Step 2.
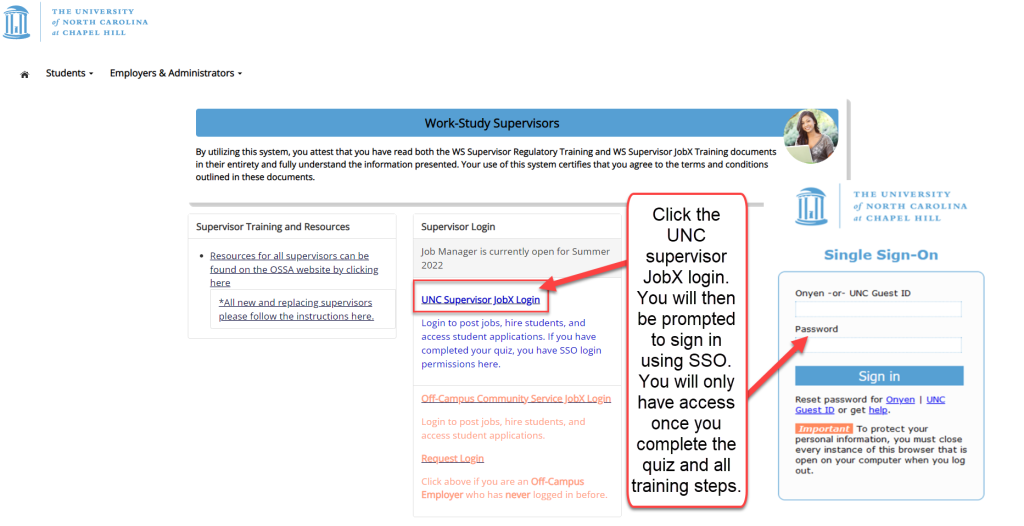
Click the UNC Supervisor JobX Login link, you will then be prompted to sign on through SSO. Please note, that you will have to have completed the quiz and all training steps to have access.
Step 3.
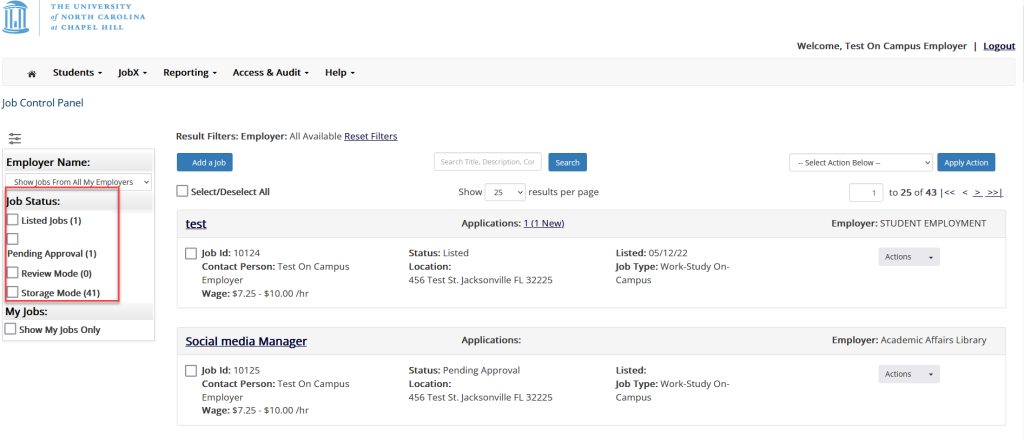
After you log in you should see the ‘job control panel’. You will see any active, pending, or previously ended positions.
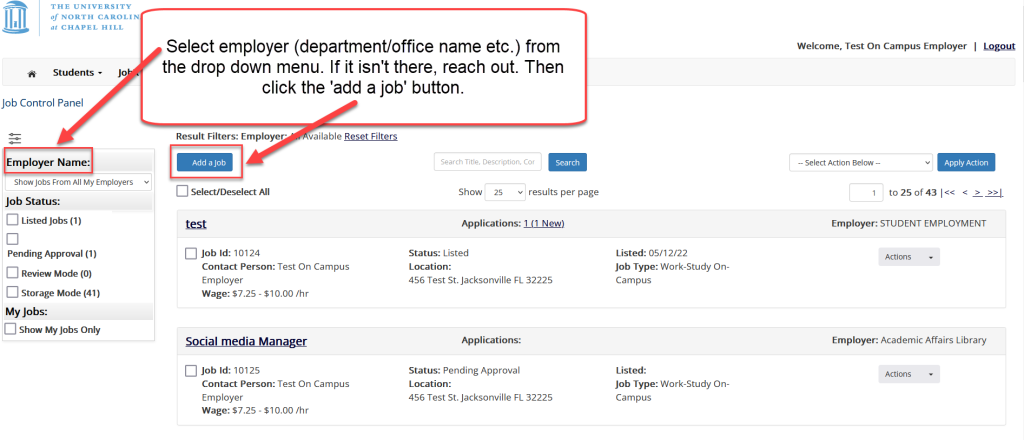
Step 1.
On the job control panel, select employer name from drop-down menu. Then click on the ‘add a job button’.
Step 2.
If you have a SSO login, and are UNC affiliated then you are automatically posting under ‘on-campus’ jobs regardless of physical location. If you are a returning work-study supervisor and will be updating previous positions, you can skip to the next menu section. If you are creating a new position, the following information will be about creating new job profiles.
- Before creating your new position, please refer to our job development guide. It will be helpful to have it up as you work through the next steps.
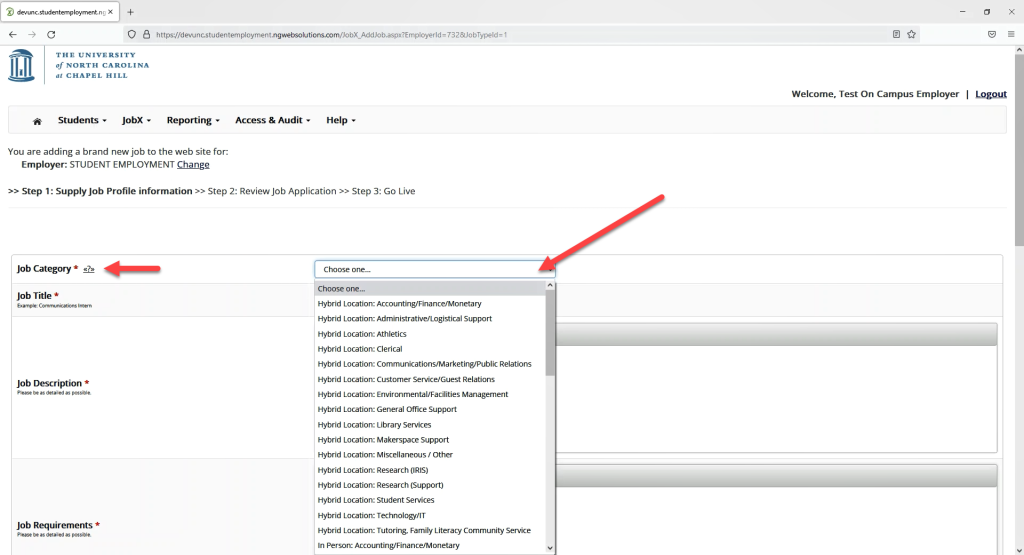
Step 3.
Select Job Category:
- In-Person: Job is completely preformed in-person
- Hybrid: Student’s location will vary from working virtually or in-person
- Virtual: Job is completely preformed virtually.
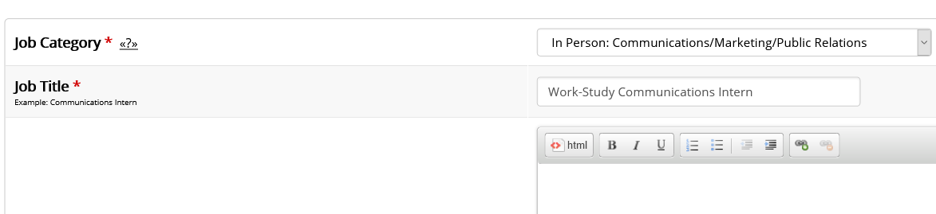
Step 4.
Job Title: The official title of the position that you would like displayed to students. In many cases this is also the official position title used with Human Resources, but it can also be a less official description.
Example: a position washing glassware & assisting with equipment in a research laboratory might use the title “Laboratory Maintenance Technician I” or “Student Worker in Research Lab”
Students may look through dozens of job postings before submitting an application. Try to make your job title representative of the position and its duties rather than a generalization. For example, “Davis Library Rare Books Collection Assistant” is much better at attracting applicants than “Student Worker in Library”.
- Make it something that will be powerful on a growing resume
- Promote management, responsibility, and skill to gain interest
Step 5.
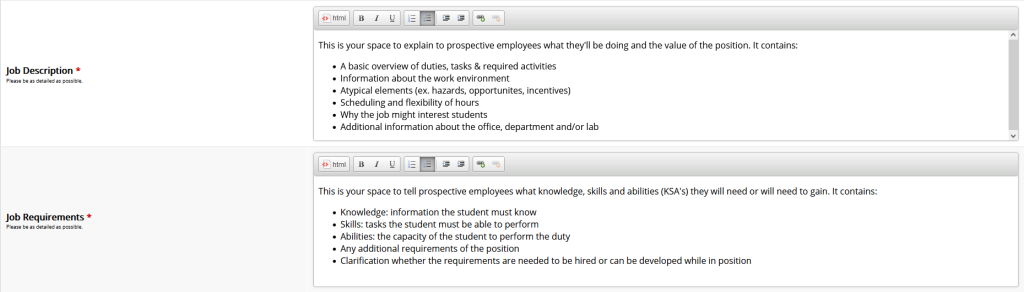
Job Description and Job Requirements: List the skills students will gain under learning outcomes from the job development guide.
Job Description:
This is your space to explain to prospective employees what they’ll be doing and the value of the position. It contains:
- A basic overview of duties, tasks & required activities
- Information about the work environment
- Atypical elements (ex. hazards, opportunites, incentives)
- Scheduling and flexibility of hours
- Why the job might interest students
- Additional information about the office, department and/or lab
Job Requirements
This is your space to tell prospective employees what knowledge, skills and abilities (KSA’s) they need or will need to gain. It contains:
- Knowledge: information the student must know
- Skills: tasks the student must be able to perform
- Abilities: the capacity of the student to perform the duty
- Any additional requirements of the position
- Clarification whether the requirements are needed to be hired or can be developed while in position
Step 6.
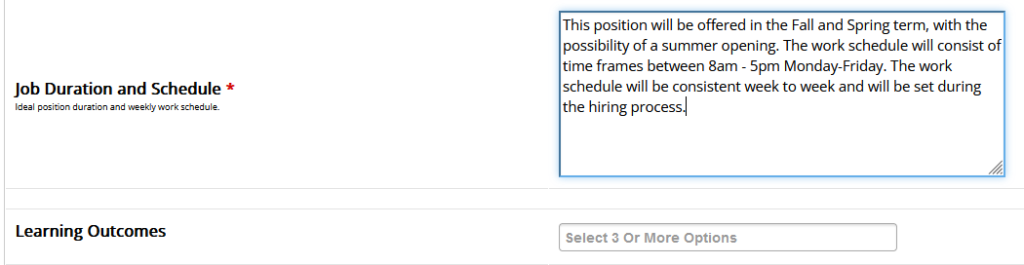
Job Duration and Schedule: Describe Timeframe/Scheduling/Flexibility
Learning Outcomes: List 3 or more learning outcomes students will develop by working in the position based on the list of skills in the job development guide. These are critical for students to develop resumes and to enhance future careers. Examples include:
- Professionalism & Work Ethic
- Career Management
- Creativity & Problem Solving
- Global Perspective
- Communication
- Technical Application
- Teamwork, Collaboration, & Leadership
Step 7.
Keywords for search: Separate by comma and add key words and areas students may search for when looking for a position.
Number of available openings: How many students do you plan on hiring in this position with the same specifications? One job profile can be used to hire multiple students, streamlining your application review process.
Hours per week: How many hours do you want your student to work per week? Max number is 20 hours per week. Most awards equate to 10-12 hours per week when students work a full semester.

Step 8.
Time Frame for this job: Select from the drop down menu.
- WS Academic Year: all WS students can apply
- WS Fall Only: all students can apply to work Fall only (see program calendar for dates)
- WS Spring Only: all students can apply to work Spring only (see program calendar for dates)
*All students who are enrolled in summer, that have financial need will need to complete the summer work-study request form on the forms page of our website.

Step 9.
Job Levels


Step 10.
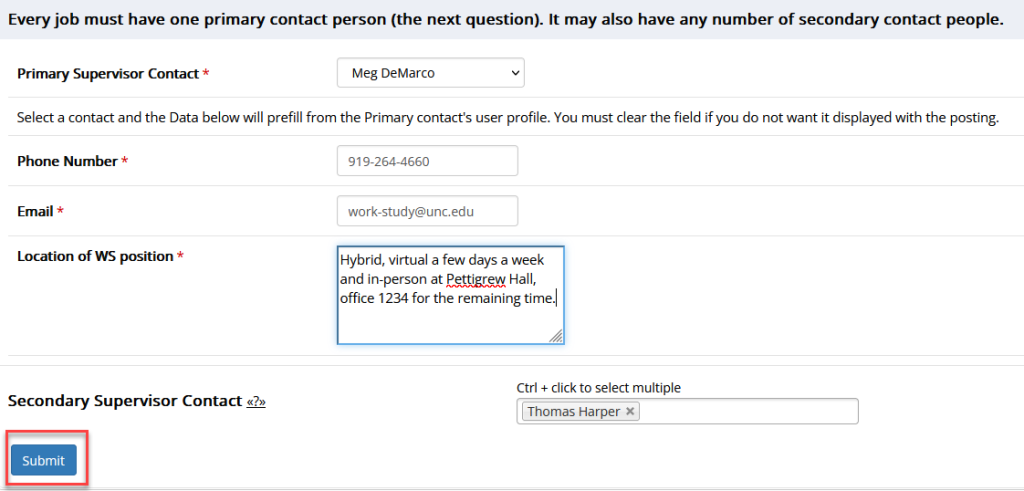
Supervisor information: Select your name as the primary supervisor. Then your phone number, email, and the location of the position. It is recommended you have a secondary supervisor listed but not required – add HR person, financial manager for updates. Click submit after filling in the information.
Step 11.
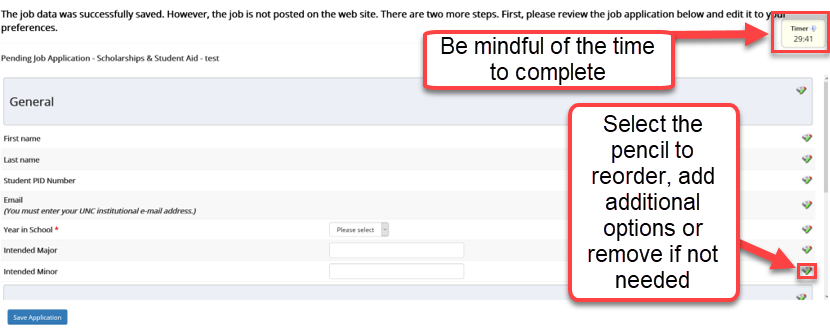
Pending Review:
On this page you review the standard job application students will fill out when applying to the position. You may add required questions at the bottom or leave as the standard template shown. You will have 30-minutes to review and post your position from this point.
Common Applications:
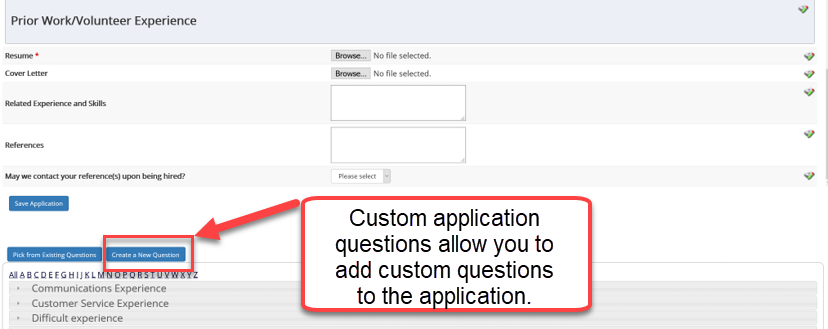
Common Application includes several required fields (student name, PID, email, year in school) and a voluntary field (major). Common Application Questions-Prior Work/Volunteer Experience contains a space for students to include their resume & cover letter as well as provide information about former employment and references
Custom Questions:
Custom application questions allow you add your own custom questions to the job application. While we’d strongly encourage you to create questions for areas related to required job duties (i.e. checking for certifications and experience), please keep in mind that there are questions interviewers and supervisors can not legally ask (e.g. do you have children). If you need help determining the legality of your question, please check with your HR Department.
This section has two tabs: Pick from Existing Questions & Create a New Question. Pick from Existing Questions allows you to add a question that you’ve already created in another job application. This is helpful if you set up your question in a previous year or another application in the current year.
Create a New Question, lets you do exactly that using a new menu in two parts.
Question Details allows you to choose the type of question from a given list including text, date, choice questions, file upload, and instructional text; the last option is extremely helpful if you’d like to relay a message to job applicants.
Once you’ve selected the type of question, the page will reset to provide data capture options that best fit the question format.
All options require the following fields:
- Question Name
- Question Label
Additionally, you may be asked to provide the following data:
- Default Value
- Regular Expression
- Require Confirmation
- Question Choices
Application Behavior governs where the question is placed. You can choose to locate the question in a new section or one of the existing sections. The first two boxes determine in which section you’d like to place the question; the last determines the question’s order within the section.
***Once you’ve finished creating your question, don’t forget to click the [Add Question] button ***
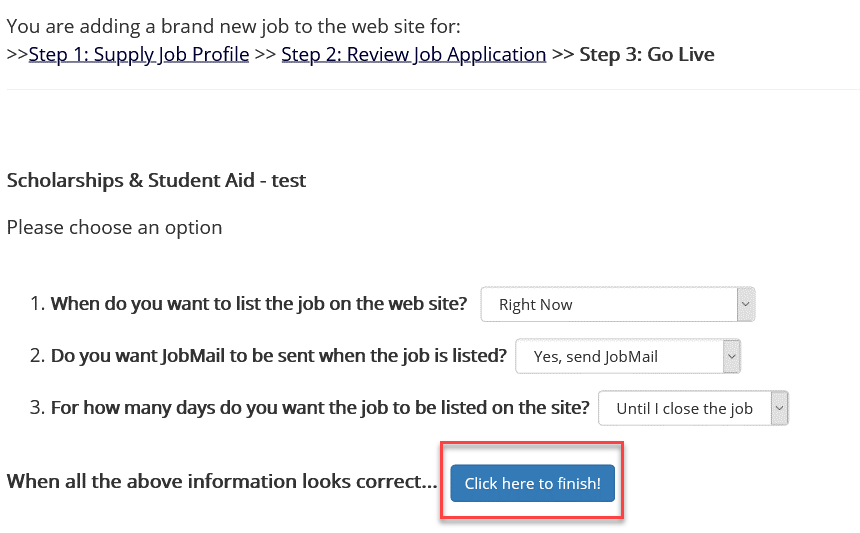
Step 12.
Go Live!
- When do you want to list the job on the web site?
You’ll want to have the job posted immediately in most cases.
- Do you want the position to be eligible for JobMail, where students are notified of positions in their interest areas?
While not required, we recommend enabling JobMail so applicants can find your job more easily.
- For how long do you want the job posted?
This question is entirely up to you. Most users leave the position posted until they chose to close it. The position will automatically close if all openings are filled; additionally, the WS Team will close all open jobs at the end of the year.
*Select Finish! You’ll be presented with the options of viewing the job or returning to the control panel. Your job will be pending as the WS team reviews! Once we approve, the position will be live.
*After the job has been posted, you can still edit the details of the job description from your control panel.
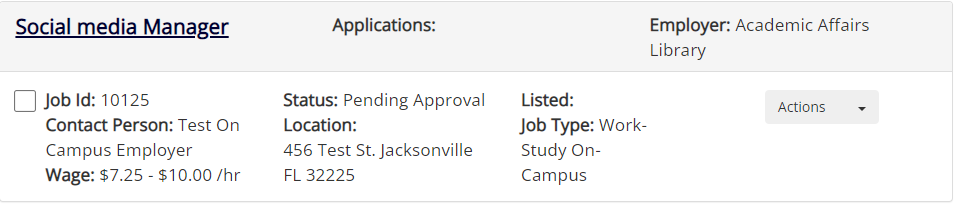
Step 13.
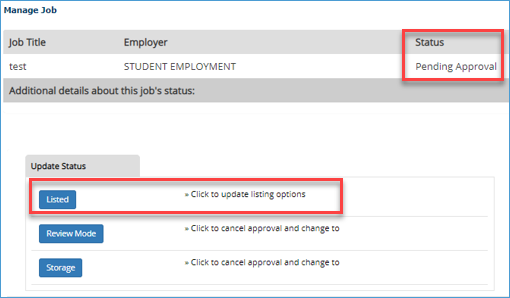
Position Approved: Once the review process has been completed and the job is listed, you’ll notice that the position will change from the “Pending Approval” section to the “Listed” section.
You can only update positions that were originally listed in the corresponding academic period for which you plan to repost. For example, if you originally posted a position in the Fall- you can update and repost for any following Fall semester but cannot repost the original Fall position in the Summer. You would need to create a new summer posting.
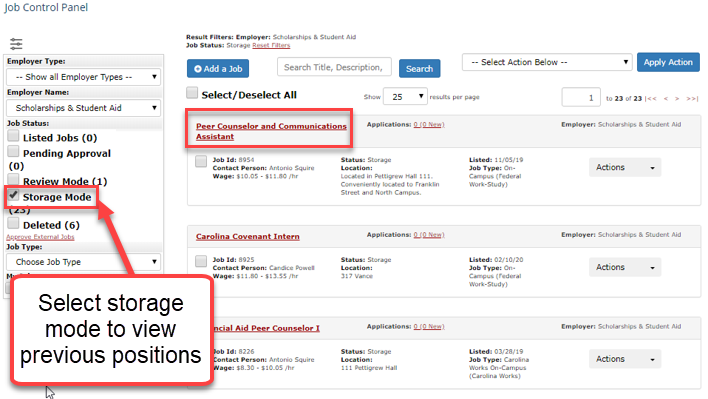
Step 1.
Find your previously listed position.
- On your landing page, click the storage mode filter to show the jobs currently in storage.
- Once your job(s) has populated click on the title of the position to enter job manager screen.
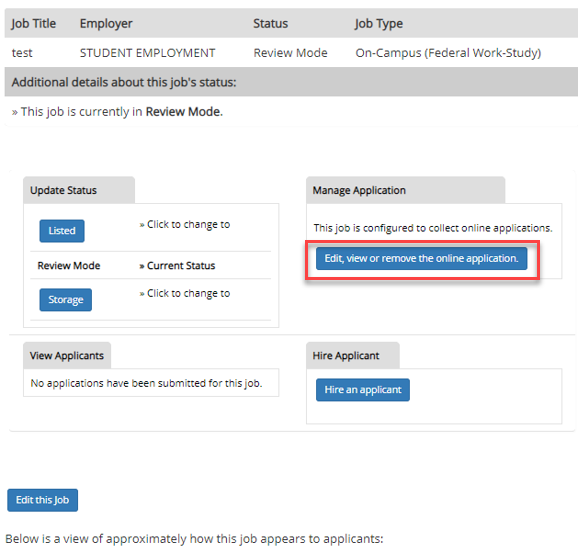
Step 2.
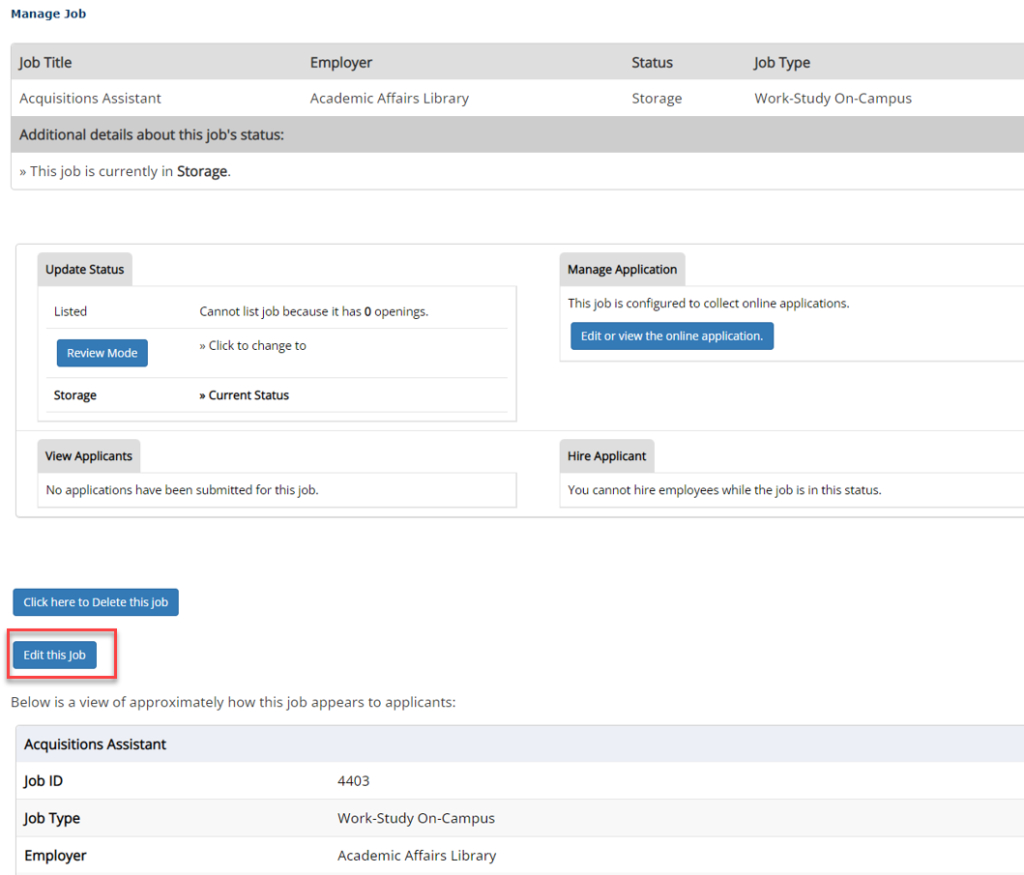
Job Management: The job management screen consists of five sections:
- A position overview of the job at the top including the title, employer, and status.
- Update Status section
- A “Manage Application” section
- A pair of sections to view and hire applicants
- A job preview section
Jobs moved into storage from previous years will have zero openings by default. In order to add jobs, you will need to use the [Edit this Job] link to open the Update Job Profile page.
Once the Update Job Profile Page is open, you will need to update the total number of jobs. If you plan on rehiring students from the previous year, you will need to account for both returning and new student workers
Step 3.
Update job profile: Refer to steps in the ‘posting a new position’ section of this page (steps 1-8) and open the job development guide. Once you have finished updating the Job Profile, save the updated position and you will be returned to the Manage Job Screen where you must edit the application questions before your posting is live!
Step 4.
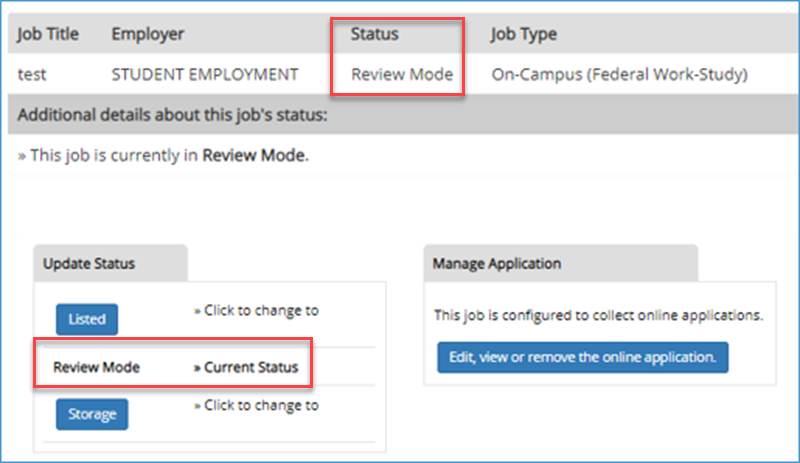
At this point you must submit the position for inspection by clicking on the Listed link in the “Update Status” Box.
Sending the position to any other status will not result in it being inspected, and applicants will not be able to view the position on JobX. The position “Update Status” should read “Pending Approval” if this step is done correctly.
After the job has been posted, you can still edit the details of the job description from your control panel.
Step 5.
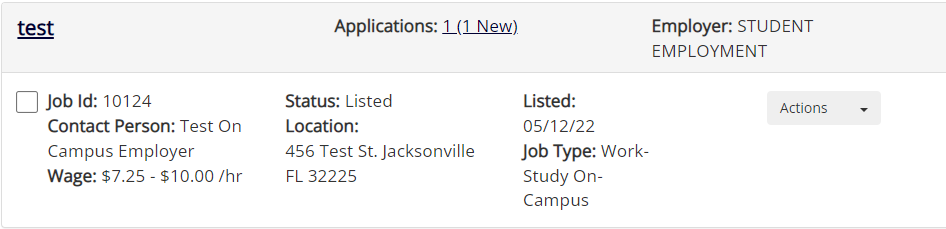
Once the review process has been completed and the job is listed, you’ll notice that the position will change from the “Pending Approval” section to the “Listed” section.
Once students begin applying for your position, you’ll notice that the information under the App# field will change from 0. The updated information will provide both the total number of applications and the number of unreviewed applications.
Reviewing applications
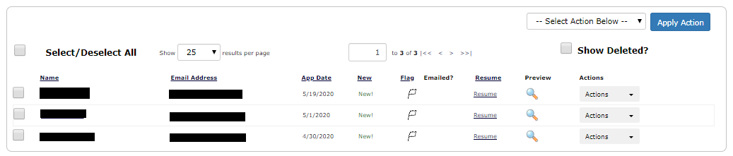
To review the applications, click the hyperlink next to the “Application” text. This will take you to the applicant review screen. You should now be able to see a list of applicants who applied to the position as well as have access to a variety of tools to assist you in evaluating the student’s application and communicating with the student
- To view the student’s applications, click on their name or click/hover on the magnifying glass symbol
- To flag the student for further consideration, click on the flag symbol
- If the student submitted a resume, you will be able to view it by clicking on the entry in the “Resume” column
- To email the student (e.g. to offer an interview) click on the envelope and pen icon
- To print a copy of the application, click the print icon

Interviewing
Once you’ve selected the student(s) you are interested in hiring, you will need to conduct an interview.
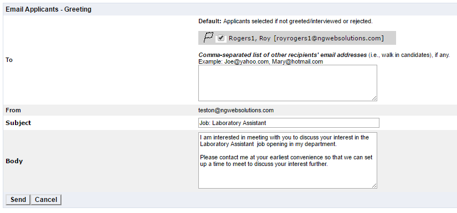
To send the interview notice:
- Check the box next to the student(s) you wish to notify
- Click the “Send Greeting” option from the dropdown
- Click the [Apply Action] button.
This will open a new prepopulated email window. The student address, subject line, and body are prepopulated, but the text can be edited to fit your needs. Once you’ve updated the message to your specifications, click the [Send] button & JobX will handle the rest.
Interviews are mandatory for new hires. You are not required to interview students if they worked for you in a similar position previously. Interviews can be conducted in person, via phone, or over the internet using programs like Zoom or Skype.
Interviews provide an invaluable opportunity to evaluate the student’s communication and interaction skills as well as gain insight into the motivations and character of the applicant.
Review our interview tips prior to scheduling.


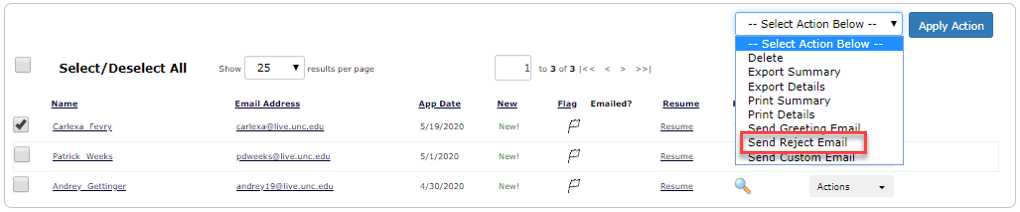
Rejecting Applicants
You are REQUIRED to respond to every applicant, even if you do not wish to interview them. Students are limited in the number of applications they can file. As such, we ask supervisors to release those students they do not wish to interview/hire so that the students can apply for other positions.
To send the rejection notice:
- Check the box next to the student(s) you wish to notify
- Click the “Send Reject Email” option from the dropdown
- Click the [Apply Action] button.
This will open a new prepopulated email window. The student address, subject line, and body are prepopulated, but the text can be edited to fit your needs. Once you’ve updated the message to your specifications, click the [Send] button & JobX will handle the rest.
Once you have selected a candidate(s) to hire, extend an offer through email, via phone, in person, or through any means you see fit.
Once your offer has been accepted, you’ll need to update JobX to officially hire the student.
Students hired without authorization through JobX will have all earned wages retroactively charged to the hiring department and the department.
Hiring for multiple vacancies? You don’t have to wait until all spots are filled to begin the hiring process. Example: you have 4 vacancies; you can hire 3 students and leave the position open to gather resumes for the 4th.
*Please Note: You may only hire one student in the system at a time, failure to do so will result in a lost hiring message for your students.*
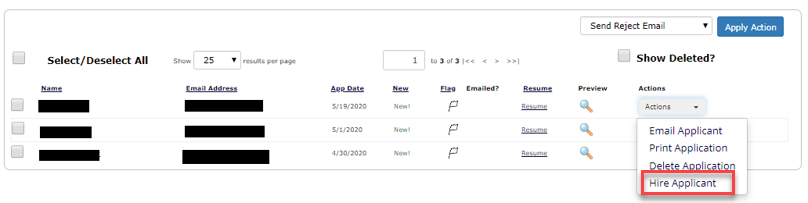
Hiring in JobX
Step 1.
Be sure to only hire one student during this part of the process.
To hire a student in JobX, start by going to your landing page. Once there select view applicant data by clicking on the hyperlink beside the “Applications” header.

step 2.
From here, click the “Hire Applicant” option in the dropdown. This will open the hire page, on which you’ll want to click the [Go to step 2] button. This will open a new page where you’ll certify the student’s information and then click the [Check Student] button.

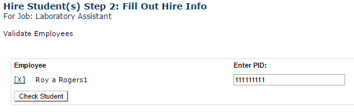
step 3.
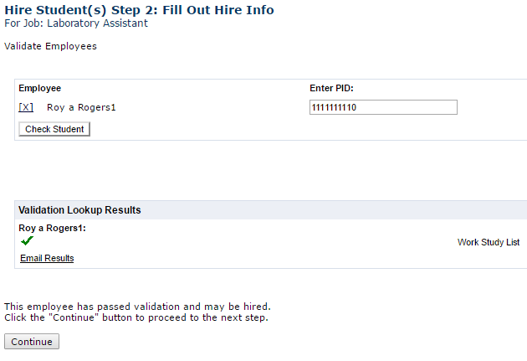
The system will then attempt to validate the student to confirm that they have a work-study award. Students who pass validation will have a green check mark and a [Continue] button populated. Clicking the [Continue] button will advance you to the “Fill Out Hire Info” screen.
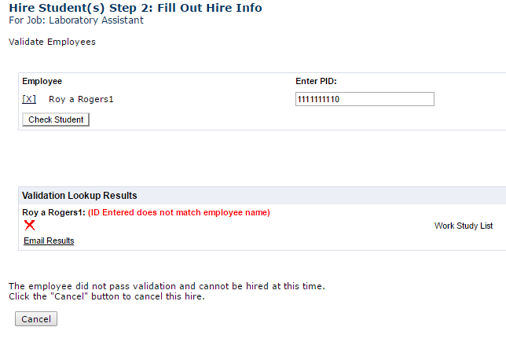
Students who do not pass validation will have a red x and a [Cancel] button populated. If this occurs, you’ll want to confirm the student’s PID and that they have a work-study award.
step 4.
Once your applicant passes the hiring check and you select continue, your system will begin a process timer. Leaving the system inactive for more than 10 minutes or failing to complete the process within 30 minutes will prevent you from properly completing the hiring process and sending an official hire email from JobX.
HR Officers/Shared Services Centers require proof of hire in JobX to set your student up as an employee in Connect Carolina & TIM. These emails can not be generated a second time without terminating & rehiring the student.
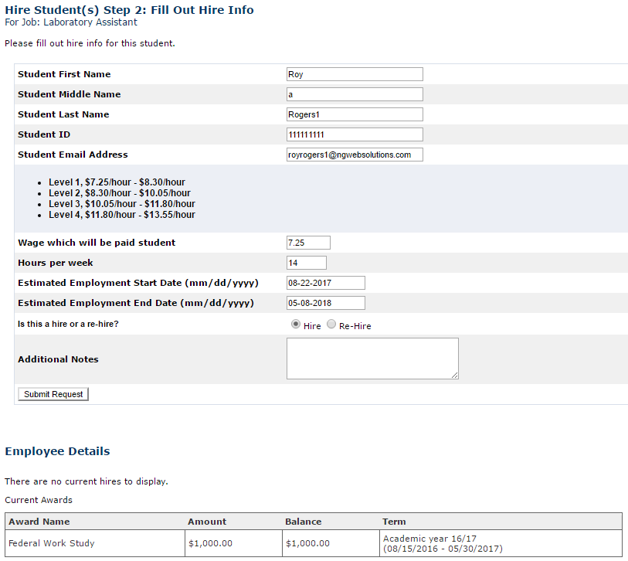
step 5.
On the “Fill Out Hire Info” screen you will finalize the position details for the individual student. To complete this screen, you’ll need to complete the following fields:
- Confirm that the student’s biographical and contact information is correct.
- Input the student’s hourly wage rate. This rate has to fit within the job level you chose for the position and will be reviewed.
- Input the expected hours per week. This figure is an approximation and can vary from week-to-week with supervisor approval.
- Confirm the estimated employment start date and end date. These dates should default to the first and last day of classes for the time frame selected during the job creation process.
- Indicate whether the student is being hired for the first time or rehired to the same position they held in the previous year.
- Provide any additional relevant notes.
- Click the [Submit Request] button.
*Pro Tip: Don’t forget to go back and send reject letters for those applications you did not select, otherwise those applicants will be tied up from applying for additional jobs.
*Pro Tip: You will want to note the student’s work student amount (Amount) and remaining work eligibility (Balance) below. You’ll need these figures to track earnings and ensure the student doesn’t exceed their award for the year.
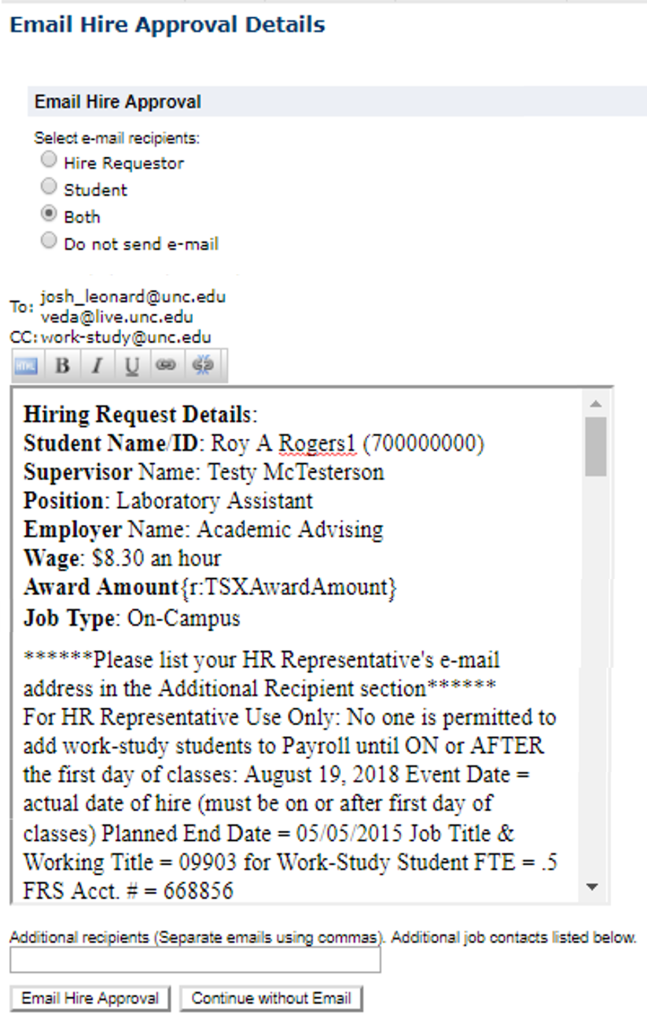
step 6.
On the “Email Hire Approval ” screen you will finalize the position details for the individual student. To complete this step, you will need to complete the following fields:
- Select the appropriate recipients. In most cases, we recommend sending it to “Both” which includes a confirmation of the hiring for yourself and the applicant.
- Copy the email for your HR Officer/Shared Services Center in the additional recipients box so that they will receive the information necessary to hire the student in ConnectCarolina.
- Click the [Email Hire Approval] button.
*Please note that the message text includes the student’s hourly rate, award amount, funding source for work-study, the name and PID of the student being hired, and the student’s position name/hosing department. This should be all of the information necessary to hire the student in Connect Carolina and track the student’s wages.
Before hired students can begin their work duties, they still need to accomplish two major categories of requirements:
- Completing the payroll process
- Completing the on-boarding process
The Work-Study Supervisor is responsible for both assisting the student with these tasks and ensuring the tasks are completed prior to the student’s first day of work.
Hired WS students must complete all required payroll forms with the hiring department’s HR representative before they can begin working. To expedite this process, you should email your departmental HR Representative or Shared Services Center (and cc the student) to set up an appointment for the student, preferably before the first day of work (in case the student has to make multiple appointments).
You should also notify the student that they will need to complete required payroll forms including the:
- NC-4
- W-4
- Direct Payroll Deposit Authorization
- Electronic I-9 Employment Eligibility Verification
Students will need to bring documentation to this meeting to complete the I-9/Direct Deposit and may need to bring the documents from home. It’s best to cover this possibility with the student as early as possible after hiring the student to minimize delays.
Feel free to refer the student to your HR representative/Shared Services Center for any technical questions which you do not feel comfortable answering.
You will also need to complete the following tasks with the student:
- Have the student complete Kronos/TIM training here.
- Show the student how to fill out the sign-in/sign-out sheet for the position.
- Give the student a tour of the work area.
- Introduce the student to coworkers and secondary supervisors.
- Explain the student’s job responsibilities in more detail.
- Review the evaluation form.
- Discuss and provide the student with a written copy of their duties, goals, & expectations.
Your may also choose to provide recommended on-boarding such as:
- Reviewing position expectations and office norms
- Setting up evaluation periods
- Discussing additional training opportunities
- Asking the student to complete job-specific privacy training
Please do not let students begin work until all Payroll & WS Training processes are completed!
Allowing students to begin working before school begins and/or payroll and training verification have been completed can result in costs to your department.
Follow the on-boarding checklist under supervisor resources to help prevent an errors from occurring!